
This post may contain affiliate links for products I use and love.
Two-Skein Granny Square Baby Blanket
This pattern is available as an ad-free PDF in my Etsy and Ravelry shops!

You may have read my post about never having time to make baby blankets since having my own children (I did manage to whip up a graphgan for my son…my daughter is still waiting for hers…).
Well, one of my favorite families is having their first child, a baby girl, and I am over the moon for these guys. I’ve always had in my head a delicate pale pink baby blanket that was just an eternal granny square. Very simple but elegant! This isn’t a novel idea (my Pinterest board is home to more than a few inspirations!) but I just love it. Granny square blankets aren’t complicated and I felt I actually had the mental capacity to make this happen (not a common occurrence these days!).

If it wasn’t working out swimmingly already, I found just the right pale pink yarn in my stash. It was *almost* a full skein, and I hoped that it would be enough! I planned on making a white border so I figured I had some wiggle room if needed.
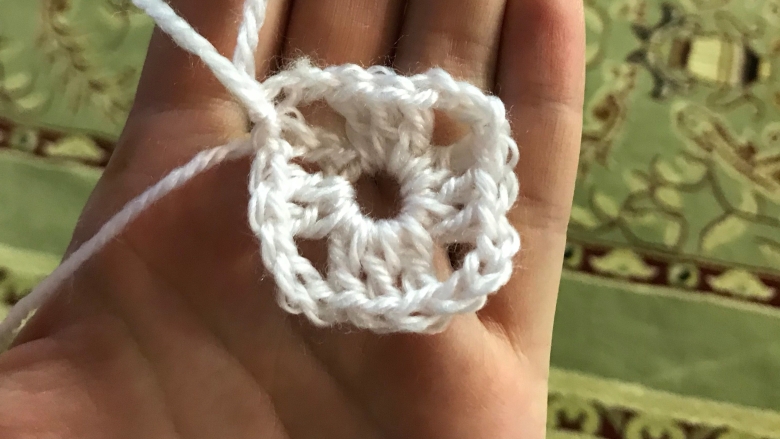
I chose to chain 6 for my starting round instead of a doing magic circle. I wanted the center to be as close to the size of the other openings that I’d be creating with the clusters and chain-1s. I love me some consistency.
I followed a general granny square pattern, making a chain 1 between clusters and chain 2 at the corners.

I did 22 granny square rounds, and my final pink dimensions were about 23 x 23 inches. The white border added on around 3 inches, so my final dimensions were 26 x 26 inches.

The border took me some time and some frogging to perfect. Okay a lot of frogging. I also let my kid watch Paw Patrol for a full hour while I figured it out. To help, I’m going to include pictures in the pattern below. As with any border, you may need to finagle it by skipping a stitch here and there or changing your hook size. I went down from a 5 mm hook to 4.5 to remedy the border wave.

Lately I’ve been in love with blankets that have a sweet ribbon around the border. I didn’t have any on hand, but I did manage to get my hands on some and I think it was SO worth it! I insisted on using 1 inch ribbon even though it’s more prone to folding. I needed a statement ribbon fit for a southern belle, and a 1/2 inch just wouldn’t do.

I pulled the ribbon out from the spool as I wove it through the treble crochet posts, just so I could be sure I wouldn’t cut off too little and have to cut a new portion off.
I really enjoy understated simplicity, and this blanket to me exemplifies simplicity and elegance. I love it!

Here is the pattern if you want to try it out yourself! It is also available as an ad-free PDF in my Etsy and Ravelry shops.
Pattern
Materials:
- Baby weight (category 3) yarn, 2 colors, 1 skein of each color.
- Size 5 mm hook (additional 4 – 4.5 mm hook for border if necessary)
- 1 inch satin ribbon
- Tapestry needle for weaving in ends
- Sewing needle and thread
- Scissors
Abbreviations:
This pattern is written in US terms.
- ch = chain
- ch sp = chain space
- sl st = slip stitch
- sc = single crochet
- dc = double crochet
- tr = treble crochet
- st = stitch
Pattern:
Create the foundation round: Ch 6, sl st into the first ch. (As mentioned earlier, I chose this in lieu of a magic circle because I wanted the extra space within the center “hole.”)
Round 1: Ch 3 (this counts as your first dc), 2 dc. *Ch 2, 3 dc.* Repeat * 2 more times. (You will have 4 clusters of 3 dc.) Ch 2, sl st into 3rd ch of the initial ch 3.
Round 2: Sl st across cluster of dc (should be 2 additional sl st). You will be at a corner. Ch 3, 2 dc into corner ch sp, ch 2, 3 dc into same ch sp. *Ch 1, 3 dc into ch sp. Ch 2, 3 dc into same ch sp.* Repeat * 2 more times. Ch 1, 3 dc. Ch 1, sl st into 3rd ch of initial ch 3.
Round 3-22: Continue pattern above, adding “Ch 1, 3 dc into ch sp” for each additional chain space along the sides (each round will end up with 1 additional ch sp), and “Ch 1, 3 dc into ch sp, ch 2, 3 dc into same ch sp” for the corners. To finish the last round, sl st into the 3rd chain of the round’s initial ch 3. Do not sl st across the cluster. Tie off first color or go directly to second color (some good tips on changing colors here).
Border Round 1: Switch to your second color. Ch 1. You will be approaching a corner. Sc across the first cluster. Border Round 1 Corner: 3 sc into ch 2 sp at corner. Sc across the next side: Sc into each st in cluster, sc into ch 1 sp (Note: my second color yarn was slightly heavier than my first color. I had to modify my Sc across the sides for the border. If I did a sc in every st and ch sp it was too much and created a wave in my blanket. I had to go down a hook size (from 5 to 4.5) to remedy this. Depending on the weight of yarn you use, you will need to adjust accordingly. Play around with it, see what works!) After sc across the last cluster on the side, repeat Border Round 1 Corner.
Border Round 2: Sl st into first st of last round. Ch 3. Dc to corner (corner consists of 3 sc). Border Round 2 Corner: In first corner sc: dc, ch 1. In second corner sc: dc, ch 3, dc into same sc, ch 1. In third corner sc: dc, ch 1. Dc into each sc across the side. Repeat Border Round 2 Corner for the next 3 corners.
Border Round 3: Sl st into ch 3 from previous round. Ch 4 (this counts as your first tr). Skip 1 st, tr into next st, *Ch 1, skip next st, tr into next st* Repeat * to corner. Ch 2. Border Round 3 Corner: Tr into ch 3 sp from previous round’s corner, Ch 5, tr into same ch sp. Ch 2, tr. *Ch 1, Skip 1 st, tr into next st* Repeat * to corner. Repeat pattern for Border Round 3 Corner for each subsequent corner. Repeat * for each side.
NOTE: I added in a “sideways” tr to my corners in order to better anchor the ribbon. This is optional, depending on if you prefer to sew ribbon down to each side, or if you want a continual ribbon around the whole blanket. If you want to add the anchor do the following at each corner:
Border Round 3 Corner w/Anchor: Tr into ch 3 sp from previous round’s corner, ch 5, tr into ch sp created by the tr you just completed (see picture). Tr into same ch 3 sp from previous corner. Ch 2, tr.

Border Round 4: Sl st into initial ch 4 from the last round. Ch 3. *Dc into ch sp, dc into tr* Repeat * til you get to the tr ch 2 immediately before the corner (corner will consist of Ch 5 between 2 tr, with or without the anchor stitch). Complete 2 dc into ch 2 space before corner. Border Round 4 Corner: Complete 2 dc into ch 5 sp, ch 3. Complete 2 dc into same ch 5 sp. Complete 2 dc in ch 2 space from previous row. *Dc into tr, Dc into ch sp* Repeat * to next corner. Repeat pattern for Border Round 4 Corner for each corner. Repeat * for each side.
Border Round 5 (shells): Sl st into first st of last round. Skip 2 st, 6 Dc into next st. Skip 2 st, sl st into next st. On the last shell before border, skip 1 st, sl st into next st. Skip st, and follow corner patter. Border Round 5 Corner: 8 Dc into Ch 3 sp, skip st, sl st into next st. Skip st, 6 dc into next st. *Skip 2 st, 6 Dc into next st. Skip 2 st. Sl st into next st.* Repeat * to next corner. Repeat Border Round 5 Corner at each corner. Repeat * for each side.
Weave in your loose ends with a tapestry needle.
Adding the ribbon:
From the spool, weave the ribbon through the tr posts that make up row 3 of the border.
If you made the anchor stitch: At the corners, loop the ribbon under and around the anchor stitch, as shown in the pictures below. You should be woven the same way on both posts surrounding the anchor stitch. For example in the pictures, the ribbon is woven below both the corner tr posts. They should be either both over or both under. Not one woven under and one woven over.


If you did not do the anchor stitch – Loop the ribbon around the first corner stitch and sew the end of the ribbon to itself on the other side of the post. To initiate the next side, loop and sew around the tr post in the same fashion, and continue weaving across the side.
NOTE: I recommend sewing down the ribbon with a regular needle and thread on a couple of tr posts per side. I suggest this for two reasons: First, because you can never be too safe when it comes to newborns! And second because the ribbon folded easily and it looks much more professional when it lays flat.
To tie the bow, you can use some creative license to see what works for you. I made sure that my ribbons came out on the same side as each other (over or under the tr post). I then sewed them together to make a perpendicular cross. I also stitched the edges of the ribbon to some of the corner posts to make sure it would stay in place.
Ensure you have enough slack to tie your bow, then cut the ribbon from the spool ensuring both ends are similar length. I cut mine on a slant.
Tie the bow, smoothing and adjusting the ribbon to look professional. I used thread to sew through the middle of the bow to ensure it would not come undone. You can hide the thread’s knot by inserting your needle under the top layer of the bow’s knot, and then going down through the bow’s knot completely. You may need to use scissors to adjust the ends of the ribbon to be completely even.

That’s it! I bet it looks great. Be sure to tag me on Instagram, I’d love to see what color combos you use – the possibilities are endless!
Don’t forget I have this pattern available as an ad-free PDF in my Etsy and Ravelry shops!
(C) Nicolle Bernard 2018
Pin me for later!

Thank you, Nicolle! That blanket is prize winning ..you have always been so good at knitting and crocheting. I’m a newbie at crocheting, but I would like to do the granny squares. As one mother, woman, and human…to another, it’s so good to see that you have hobbies…they help through good and hard times…at all ages! The blog is good too…keep up the good work. Love you, Aunt Christine 😍
How much ribbon is best please.
I would get at least 10 ft so you have a little extra to work with. Then you can trim it up 🙂
Thank you beautiful blanket. I’m using variegated it looking pretty so far. X
That sounds lovely!
Can you tell me how many yards. Of #3 yarn each skein is that you used?
Hi! Ahh, as my first pattern I did not get exact yardage for this one. I used less than 1 skein of each color though, so I will say probably around 200 yards or so.
I am having a hard time with round 2 I have crocheted for 56 years and made many granny squares but this pattern doesn’t work out. Not sure what I did wrong
Hi Luann! You are right, there is an extra “ch 1, 3 dc into ch sp” in the pattern. Apologies for the confusion, and thank you for pointing it out. I just updated the pattern to remove the error. Round 2 should read:
Round 2: Sl st across cluster of dc (should be 2 additional sl st). You will be at a corner. Ch 3, 2 dc into corner ch sp, ch 2, 3 dc into same ch sp. *Ch 1, 3 dc into ch sp. Ch 2, 3 dc into same ch sp.* Repeat * 2 more times. Ch 1, 3 dc. Ch 1, sl st into 3rd ch of initial ch 3.
Thanks! – Nicolle